Klarna Official for PrestaShop
PrestaShop Module User Guide
Klarna has created a PrestaShop Module to fully integrate Klarna Checkout and KPM in corporate with Prestaworks AB. Klarna Checkout is a replacement of the standard checkout on most PrestaShop sites today. Having the goal to simplify buying, the Klarna Checkout experience is simple, fast and secure. Klarna simplifies buying.
Requirements This is what you need to set up Klarna in your PrestaShop
- Supported PrestaShop Version
- PS 1.6.X
- PHP Version 5.4
- Decimals needs to be active on the currency in the shop.
Installation guide A step-by-step guide for installing the module in your store
Install the module
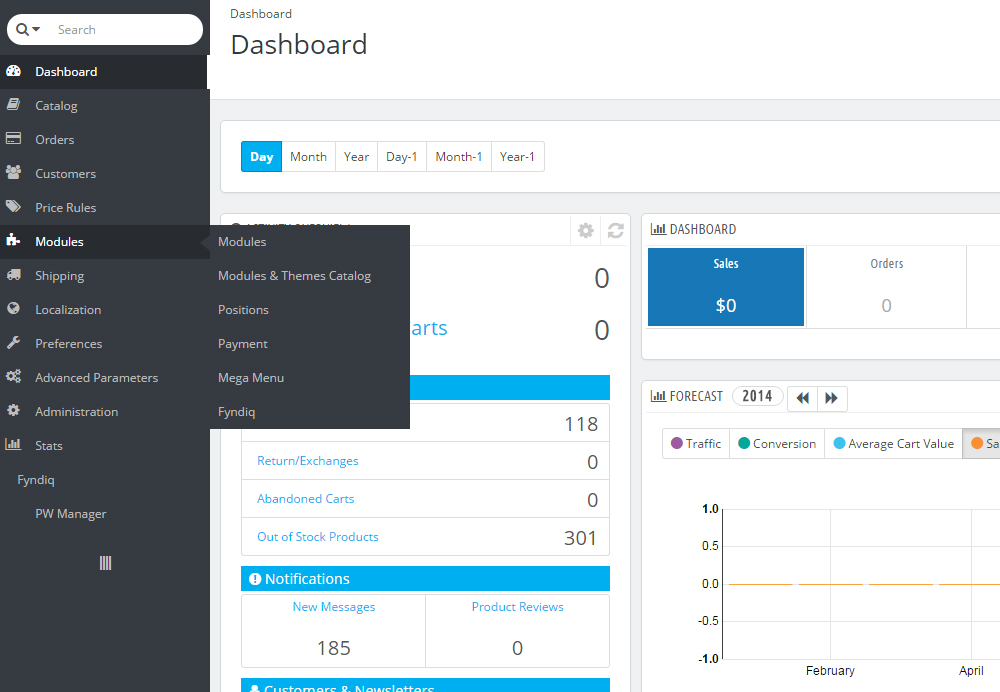
- Start by navigating to the modules tab in your back-office PrestaShop.
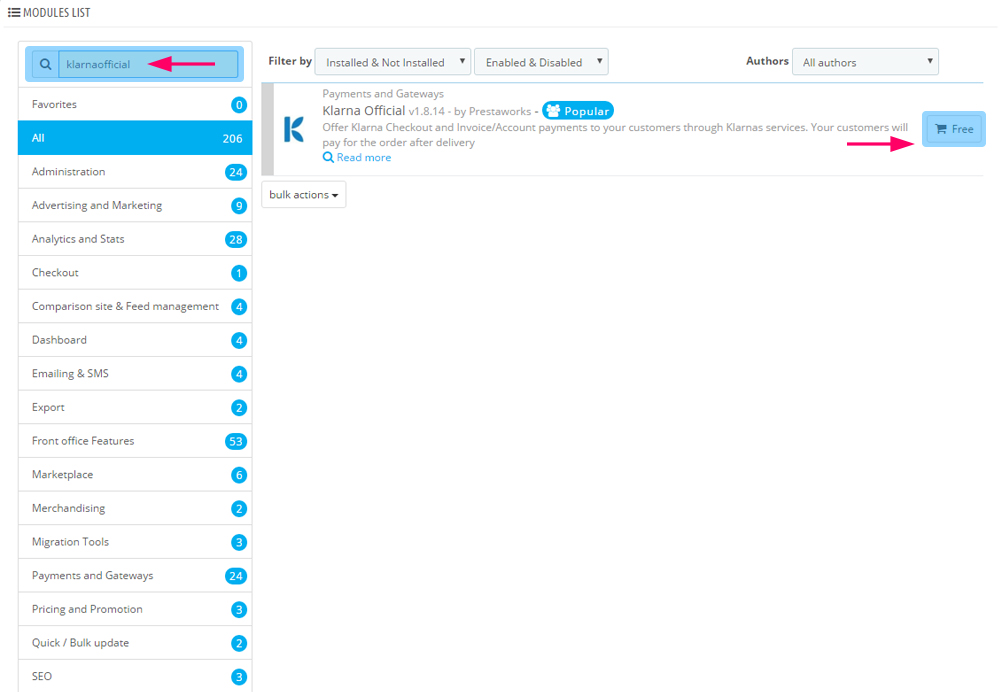
- Scroll down until you find the search function for your modules, type in and search for: klarnaofficial.
- You will receive one hit for the search - Klarna Official by Prestaworks. At the very right, hit the button called Free
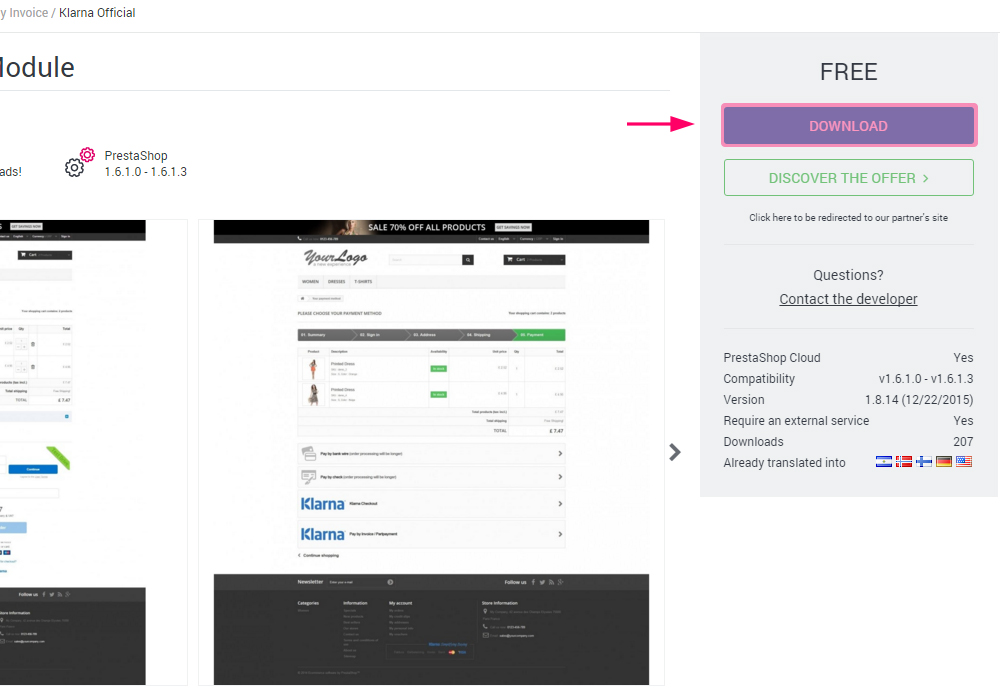
- Now you will have information from PrestaShop add-ons where you can find a large blue button to download the integration - save it to your computer.
- Go back to Modules in your Back Office and hit the button called "Add a new module" at the very top right corner.
- A new block with the topic "Add a new module" will expand below - hit Choose a file and locate the .zip-file that you've downloaded to your computer and then click on "Upload this module"-button.
- The module will now be available in your system to be installed. After submission, you can scroll down and see that the button has changed name to "Install" for Klarna Official module - click the button!
- When module has been installed, you will be automatically redirected to the module´s configuration page.
- Great job, module is now installed!
-
1.
-
2.
-
3.
-
4.

NOTE!
You can also upload the .zip-file to your modules/ catalog via FTP and locate the module by searching for "klarnaofficial" in the Modules tab.Configure the module
Klarna Official for PrestaShop is a giant integration with support for Klarna Checkout and Klarna KPM (invoice and partpayment).
This integration configuration page contains 5 tabs with different information and settings. These settings totally depend on what you're going to run in your store. We'll explain each tab below:
| Tab | Description |
|---|---|
| KLARNA CHECKOUT (KCO) | This tab contains settings for activating Klarna Checkout, enabling Klarna Checkout for different countries, along with various settings such as design (color) management in the Checkout. |
| KLARNA PAYMENT METHOD (KPM) | This tab contains settings for enabling Klarna Payment Method and enabling Klarna Payment Method for different countries. |
| COMMON SETTINGS | This tab contains settings for various features in the integration such as testdrive, send invoice method, Klarna API-call (activate and cancel) sync order status settings, and widgets.. |
| PCLASSES | This tab is only if you're running Klarna KPM and part payment. The tab will contain information about your store's assigned pclasses for part payment for your account with Klarna. |
| TERMS AND CONDITIONS | The information within this tab is mainly directed for german merchants or merchants who might start selling to Germany. The information is required in your store´s terms and conditions. |
| SETUP | The button within this tab verifies that the information provided in the integration's settings is correct and validates with Klarna. |
Configure your store for Klarna Checkout
Let us run through an example of how to configure the store for Klarna Checkout only below.
- Start by navigating to the module configuration page, and choose the tab called KLARNA CHECKOUT (KCO)
- In the vertical tab inside this tab, make sure to have General settings enabled.
- Set "Active KCO in this shop" to Yes (if you're in test-stage, you would probably run better with this option disabled)
- Then navigate to each country you would like to enable. This guide will assist with how to configure one country.
- After choosing a country in the vertical list, make sure that "Active KCO COUNTRYNAME" is set to Yes and that you've filled in your EID and Shared secret for the specific country
- Hit the button at the very right corner called "Save"
- You're done, great job!
Configure your store for Klarna Payment Method
Let us run through an example of how to configure the store for Klarna Payment Method only below.
- Start by navigating to the module configuration page, and choose the tab called KLARNA PAYMENT METHOD (KPM)
- Then you will have to navigate to each country you would like to enable. This guide will assist with how to configure one country.
- Make sure to fill your EID and shared secret for the specific country
- Hit the button at the very right corner called "Save"
- NOTE! Use the “Testdrive” setting under the main tab “COMMON SETTINGS” to control whether you are running in “TestDrive” or “Live” mode. This will drive if calls are being made to the Klarna test or production systems. This is the only place to control Test or Live for KPM.
- You're done, great job!
NOTE!
It is possible to enable both services (KCO & KPM) at the same time in the same store. Just make sure to submit your information in corresponding tab for KCO & KPM. If no information is submitted to e.g. Klarna Payment Method (KPM) tab, it will be disabled in the front-office. The same goes with Klarna Checkout - that require you to set "Active KCO in this shop" to Yes while you've also make sure to submit your Klarna information to corresponding countries within the tab.Configure your store to add a invoice fee for Klarna (KPM only)
To create an invoice fee for Klarna KPM (invoice) orders, you need to create a new product in the store with the following parameters:
- Provide a proper name, e.g: Invoice fee
- Make sure to assign a quiet high quantity for this article, e.g: 99999999
- Submit the price for the fee in the price field
- Make sure the product is active and visibility is set to "nowhere"
- It's very important that this product has the same reference code as you've submitted in the Klarna Official-module under tab KLARNA PAYMENT METHOD (KPM) - field: "Invoice fee product".
Configure backend calls (activate and cancel)
It is possible to work with backend calls to Klarna to activate and cancel orders. Navigate to the integration configuration page and go to tab "COMMON SETTINGS":
Only full activation and full cancelation is possible.
| Setting | Description |
|---|---|
| Activate order status | In this drop-down you simply choose which order status you would like to trigger the call to Klarna for activating the invoice at Klarna. If you would like to disable this feature you will have to choose: "Deactivated". |
| Cancel reservation status | In this drop-down you simply choose which order status you would like to trigger the call to Klarna for cancel the invoice at Klarna. If you would like to disable this feature you will have to choose: "Deactivated".
In case the reservation has already been activated, a refund call is made instead. |
NOTE!
This feature concerns KCO and KCO.Other Various information regarding the integration
IMPORTANT: Klarna for different countries (currencies and languages)
If you're going to provide Klarna services (KCO or KPM) to more than one country you have to make sure that you have created all of the corresponding currencies and languages in your store.
Let's take an example: I'm setting up Klarna in my store for Sweden and Finland, My default settings in the store at the moment are aimed for Swedish customers, however, I also need to create the Euro currency and Finnish language for my Finnish customers in store administration under: Localization -> Currencies and Localization -> Languages
If you're enabling more than one country in Klarna integration and miss some of the currencies/languages, you will encounter issues with the checkout or when a customer tries to submit an order.
Template problems
This integration is developed with all the necessary standards of PrestaShop with the default template (default-bootstrap). Some merchants encounter problems with the integration together with third party templates. Here comes a list of things you should control:
- JavaScripts - Our integration uses a JavaScript-function to replace default checkout URL's in the theme to Klarna Checkout URL if enabled. You can study the function in:
klarnaofficial/views/js/kco_common.js - Font Icons - Many third party templates use different core for font icons within the template. The font icons used in our integration is mainly built together with default icons used in the bootstrap template. You will have to go through the template files (.tpl) in our integration to patch the source for icons in the integration if the icons won't appear in front-office.
Important about callbacks
The following callbacks are not implemented.
- Re-send invoice - Handled from Klarna Online.
- Partial refund - Handled from Klarna Online.
Regarding Pending orders.
If you use Klarna KPM services it is possible to get a status from Klarna for Pending Invoice or Pending Partpayment.
Orders with these statuses, should not be delivered until Klarna are complete with their evaluation.
It is possible to set up a cronjob for the following url, it will make a check and change status of these orders as the status is changed in Klarna.
If you don't set up a cronjob for this, you will need to check these orders in Klarna Online or by clicking the button on the order details page.